 Pre built UI
Customising each form field
- Modify Labels and Placeholder Text
- Setting Default Values
- Changing Optional Error Message
- Creating Custom Components
- Changing Field Order
Modify Labels and Placeholder Text #
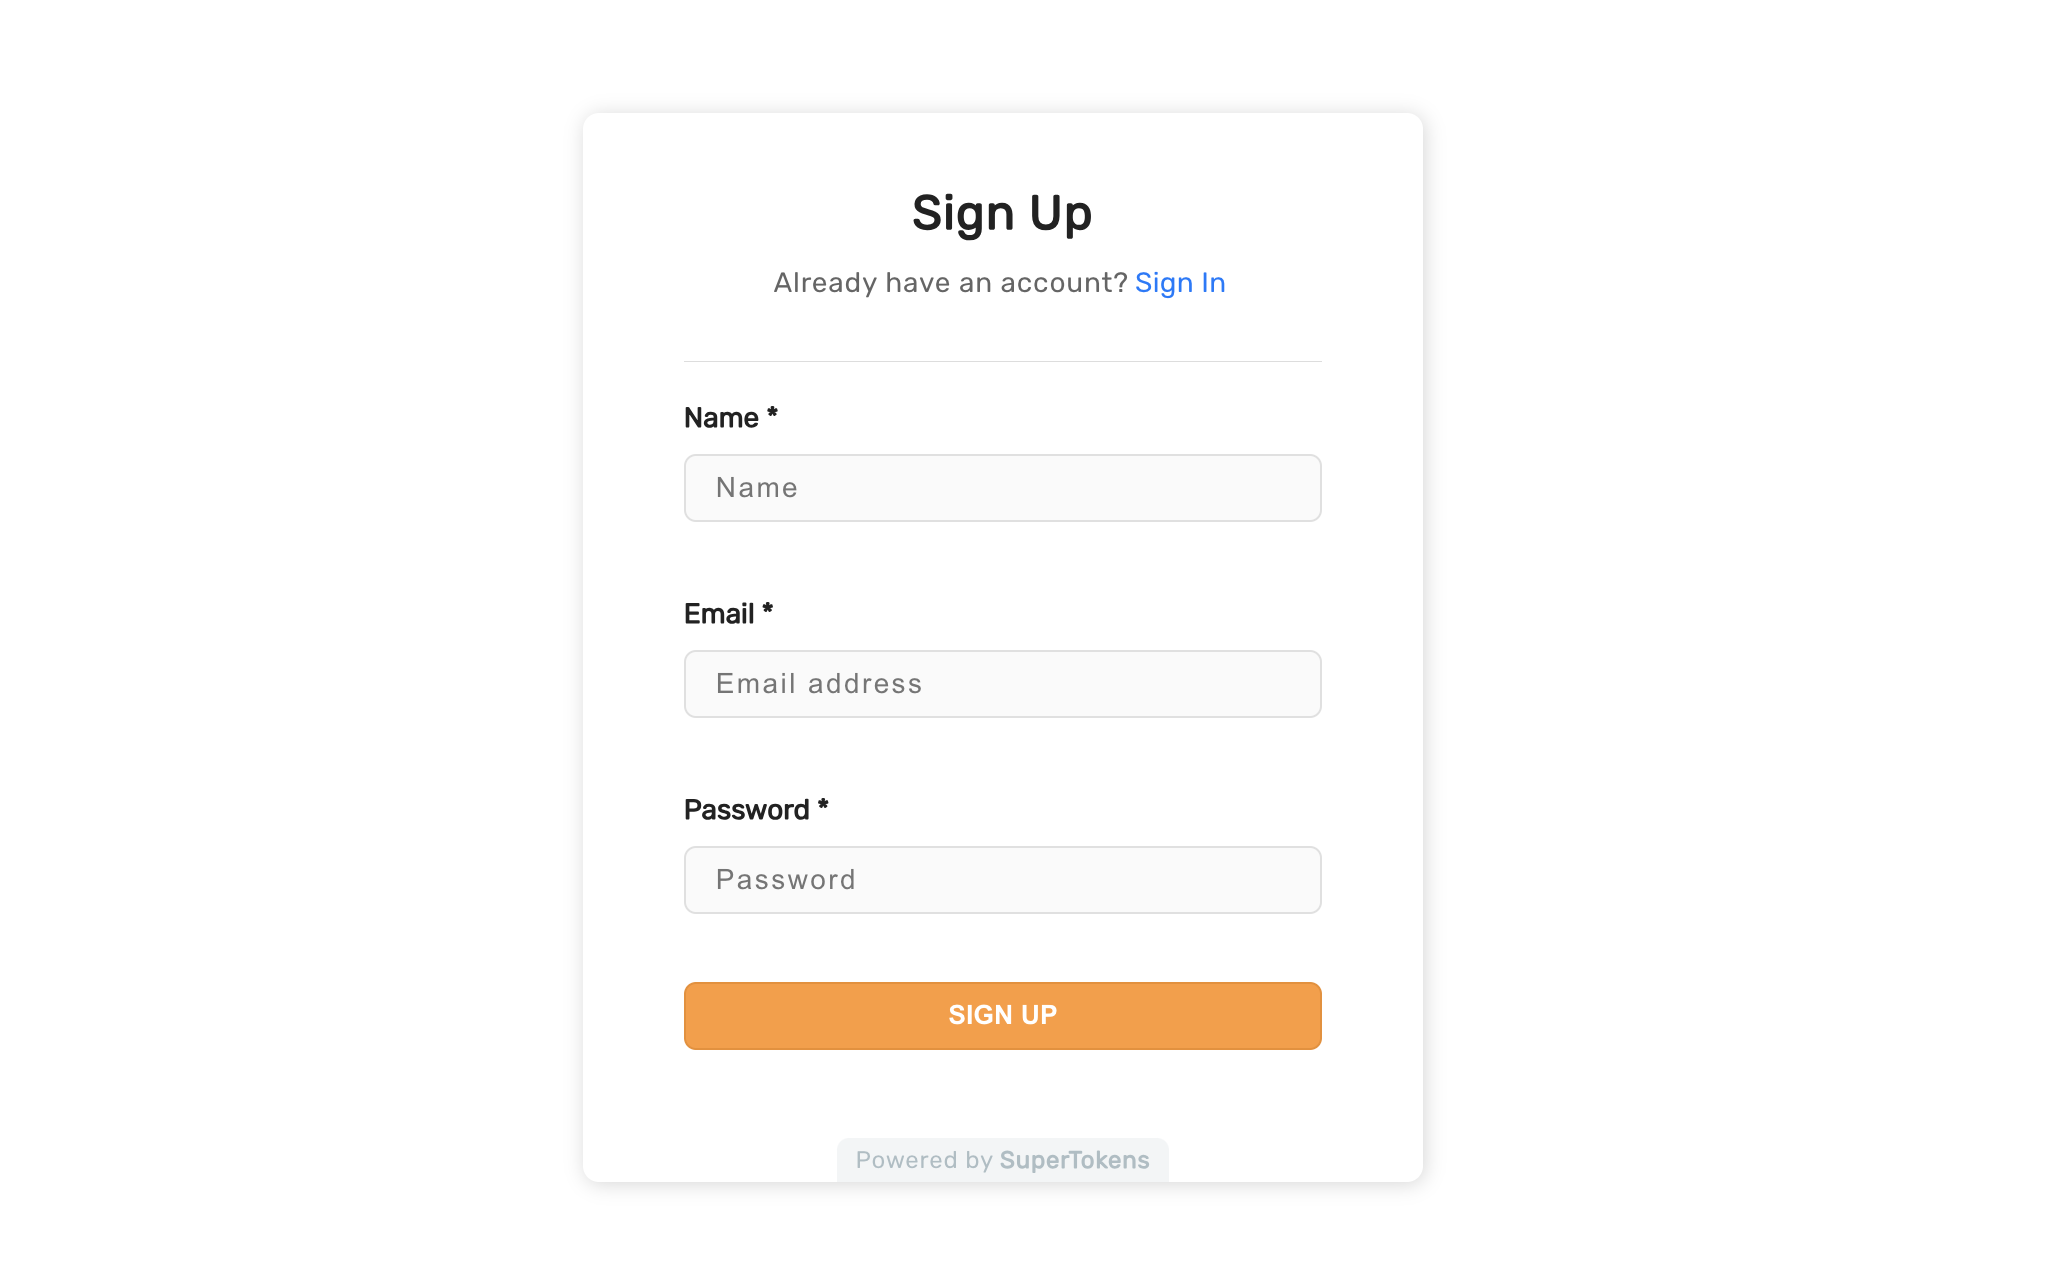
If you would like to modify the fields in the login widget, by changing UI labels or placeholder text, you can do so by modifying the formFields property when initializing SuperTokens on the frontend.
- ReactJS
- Angular
- Vue
Important
supertokens-auth-react SDK and will inject the React components to show the UI. Therefore, the code snippet below refers to the supertokens-auth-react SDK.import SuperTokens from "supertokens-auth-react";
import EmailPassword from "supertokens-auth-react/recipe/emailpassword"
import Session from "supertokens-auth-react/recipe/session";
SuperTokens.init({
appInfo: {
apiDomain: "...",
appName: "...",
websiteDomain: "..."
},
recipeList: [
EmailPassword.init({
signInAndUpFeature: {
signUpForm: {
formFields: [{
id: "email",
label: "customFieldName",
placeholder: "Custom value"
}]
}
}
}),
Session.init()
]
});
import SuperTokens from "supertokens-auth-react";
import EmailPassword from "supertokens-auth-react/recipe/emailpassword"
import Session from "supertokens-auth-react/recipe/session";

SuperTokens.init({
    appInfo: {
        apiDomain: "...",
        appName: "...",
        websiteDomain: "..."
    },
    recipeList: [
        EmailPassword.init({
            signInAndUpFeature: {
                signUpForm: {
                    formFields: [{
                        id: "email",
                        label: "customFieldName",
                        placeholder: "Custom value"
                    }]
                }
            }
        }),
        Session.init()
    ]
});
Setting Default Values #
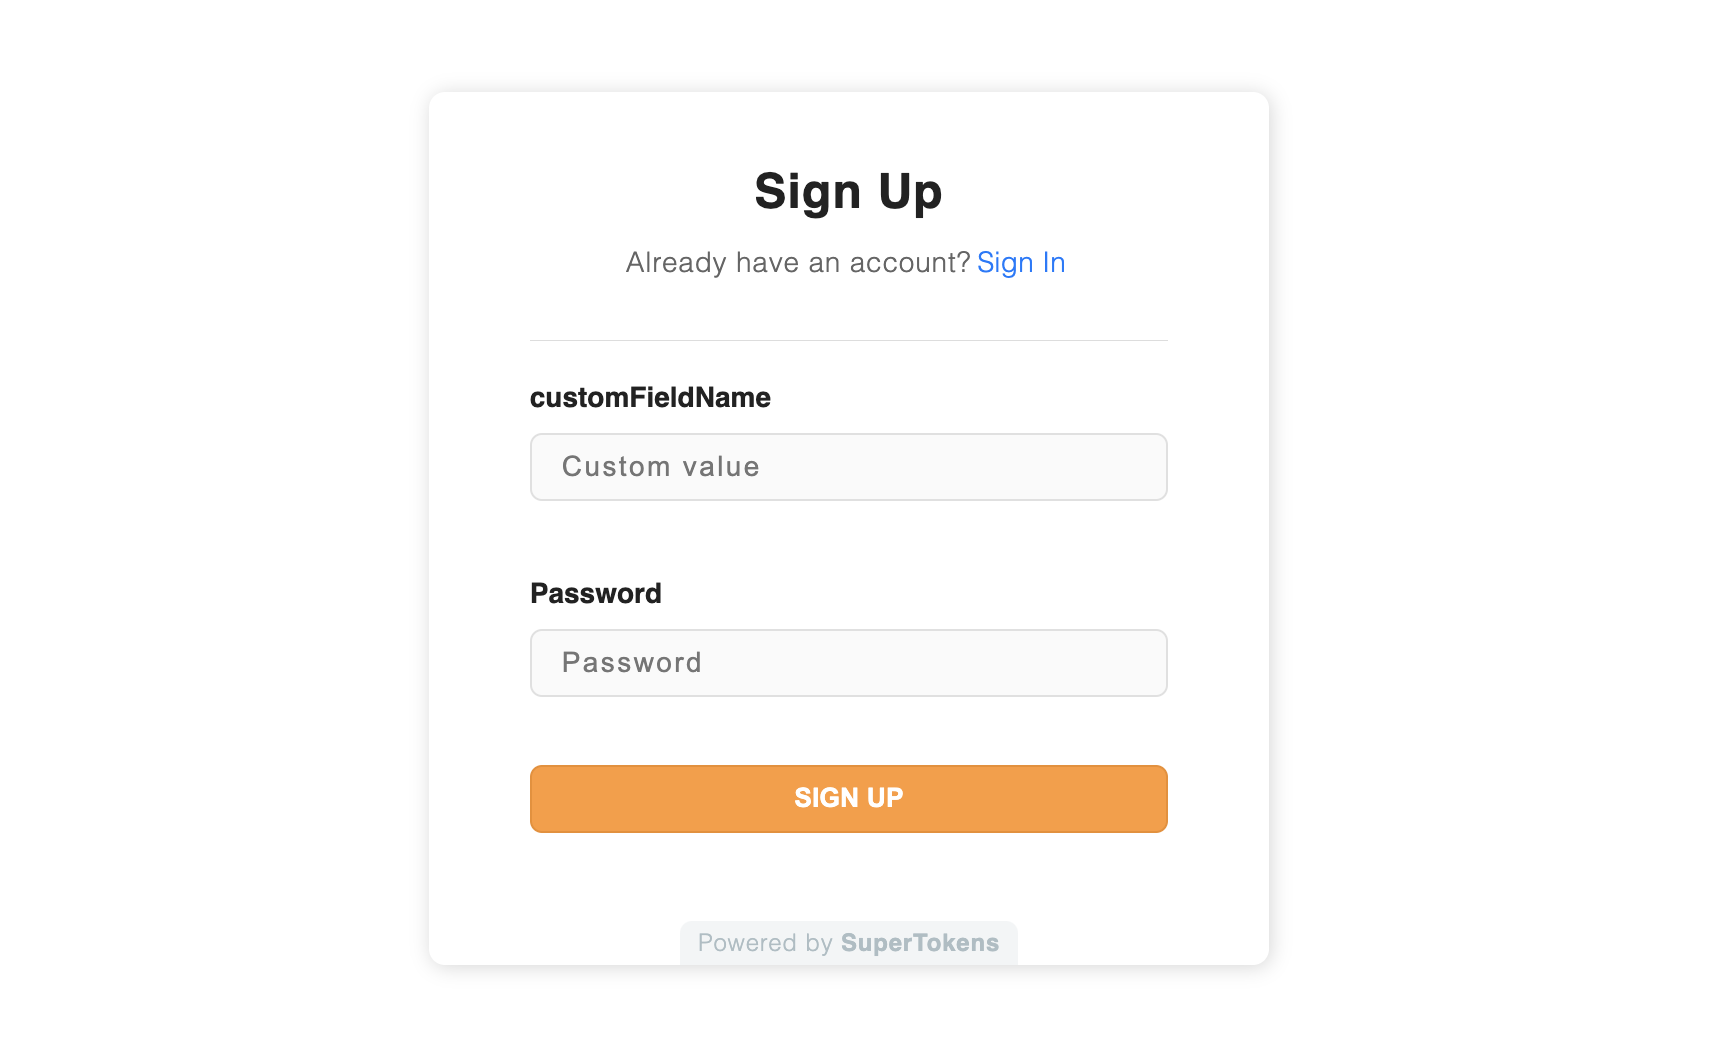
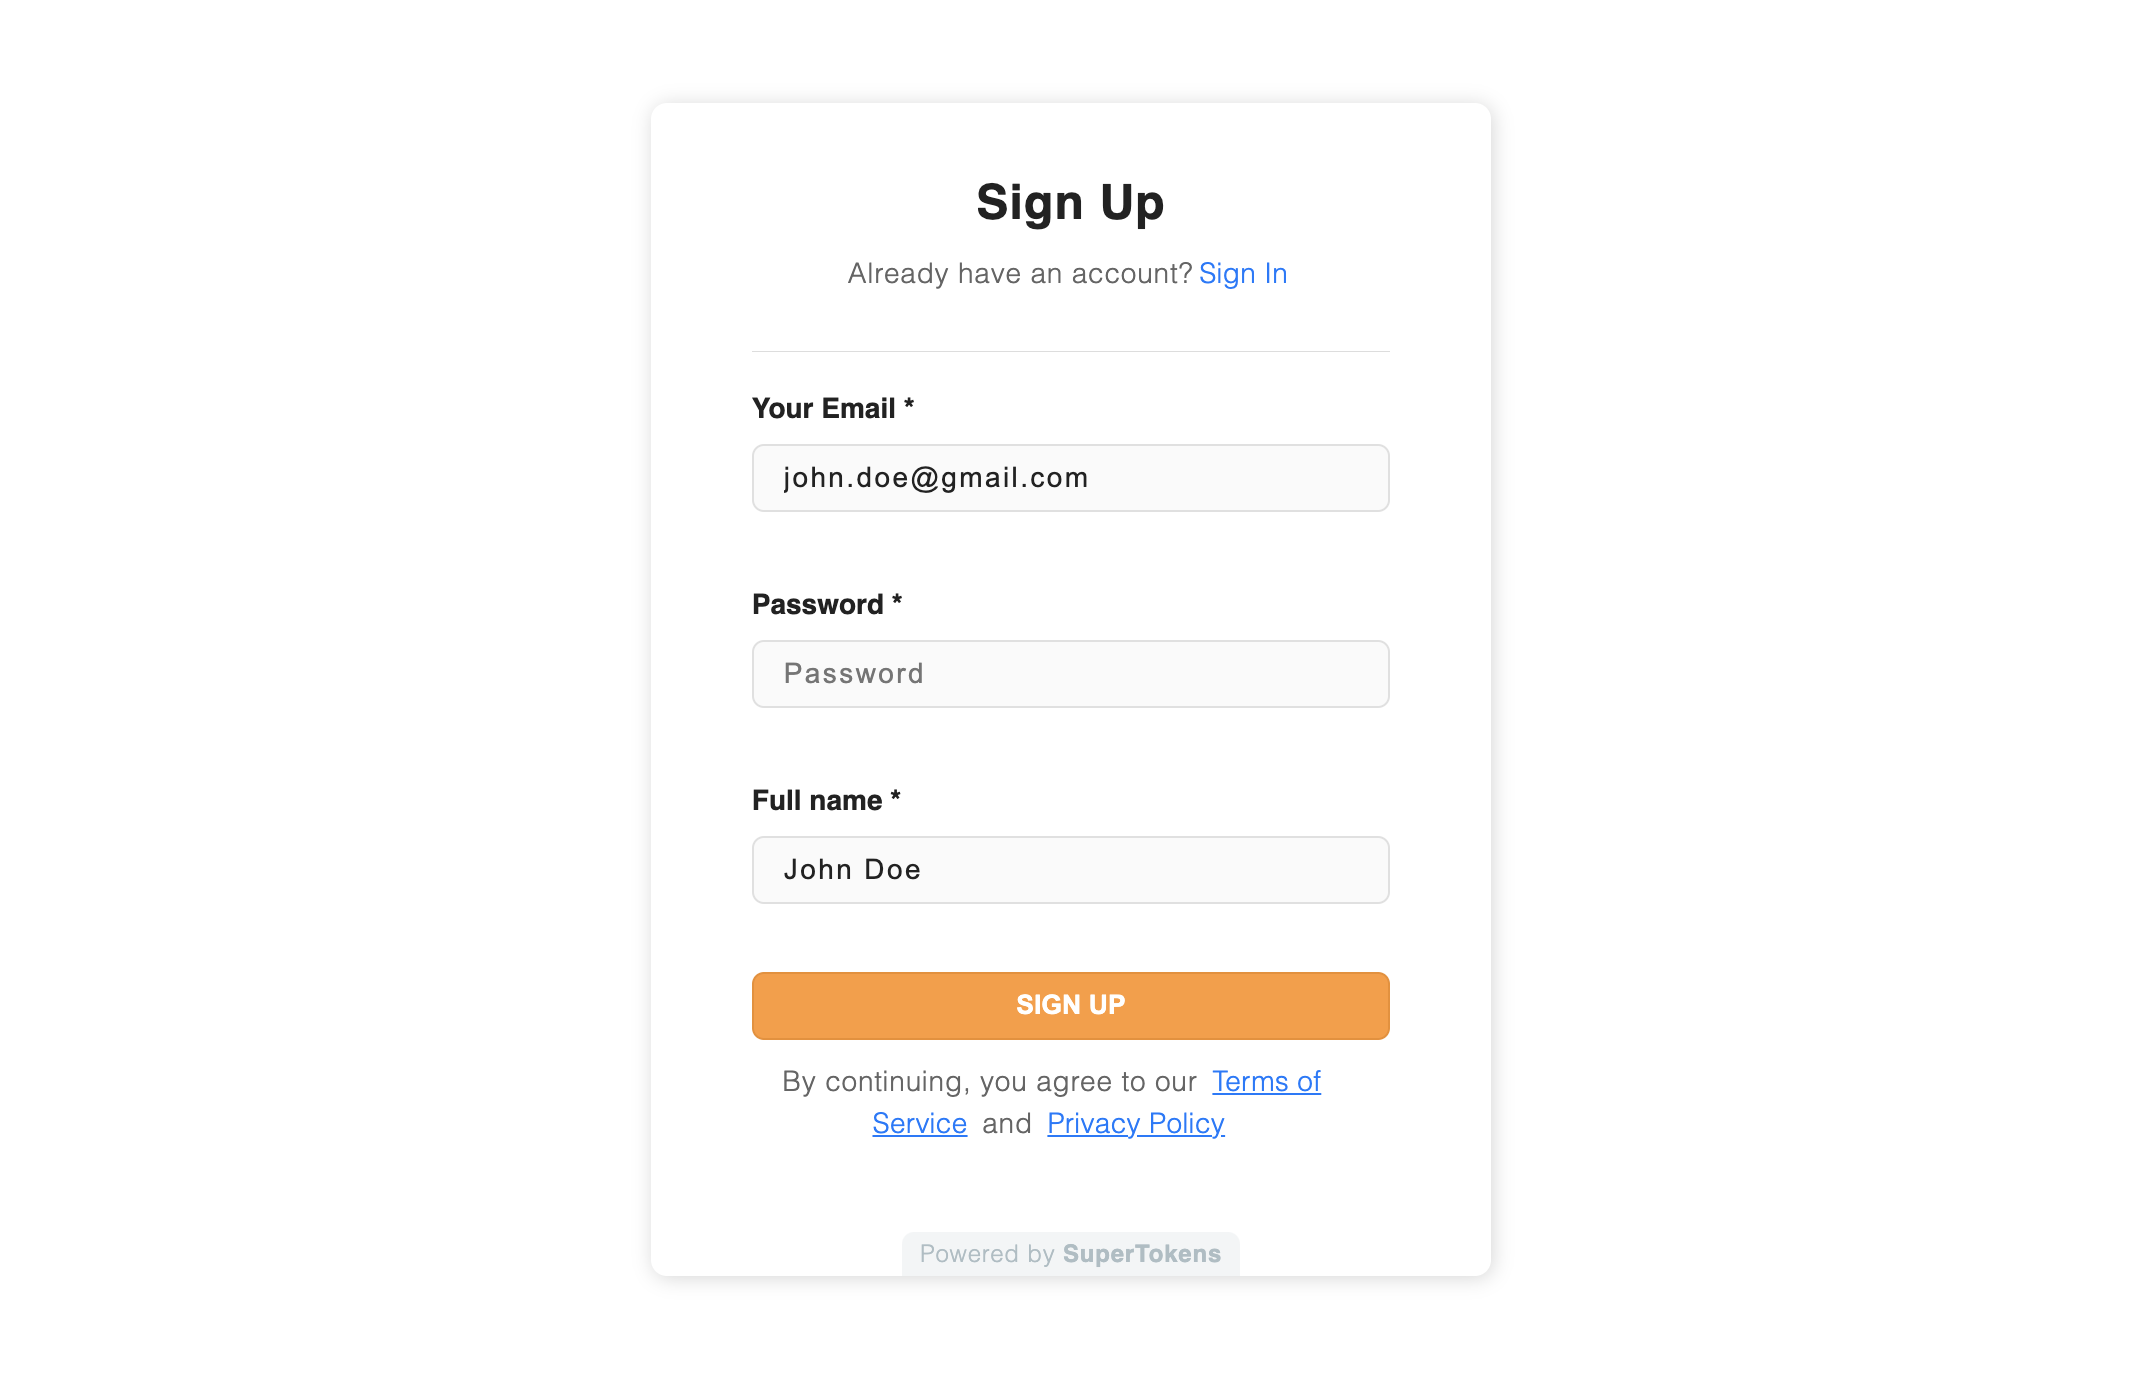
To fill in the form fields with preset values, add a getDefaultValue option to the formFields config when initializing SuperTokens on the frontend.
- ReactJS
- Angular
- Vue
Important
supertokens-auth-react SDK and will inject the React components to show the UI. Therefore, the code snippet below refers to the supertokens-auth-react SDK.import SuperTokens from "supertokens-auth-react";
import EmailPassword from "supertokens-auth-react/recipe/emailpassword"
import Session from "supertokens-auth-react/recipe/session";
SuperTokens.init({
appInfo: {
apiDomain: "...",
appName: "...",
websiteDomain: "..."
},
recipeList: [
EmailPassword.init({
signInAndUpFeature: {
signUpForm: {
formFields: [{
id: "email",
label: "Your Email",
getDefaultValue: () => "john.doe@gmail.com"
}, {
id: "name",
label: "Full name",
getDefaultValue: () => "John Doe",
}]
}
}
}),
Session.init()
]
});
import SuperTokens from "supertokens-auth-react";
import EmailPassword from "supertokens-auth-react/recipe/emailpassword"
import Session from "supertokens-auth-react/recipe/session";

SuperTokens.init({
    appInfo: {
        apiDomain: "...",
        appName: "...",
        websiteDomain: "..."
    },
    recipeList: [
        EmailPassword.init({
            signInAndUpFeature: {
                signUpForm: {
                    formFields: [{
                        id: "email",
                        label: "Your Email",
                        getDefaultValue: () => "john.doe@gmail.com"
                    }, {
                        id: "name",
                        label: "Full name",
                        getDefaultValue: () => "John Doe",
                    }]
                }
            }
        }),
        Session.init()
    ]
});
important
The return value of getDefaultValue function must be a string
Changing Optional Error Message #
When you try to submit signup form without filling in required / non-optional fields, the SDK will, by default, show an error stating that the Field is not optional. You can customize this error message with nonOptionalErrorMsg property in the formField config.
Let's see how to achieve it.
- ReactJS
- Angular
- Vue
Important
supertokens-auth-react SDK and will inject the React components to show the UI. Therefore, the code snippet below refers to the supertokens-auth-react SDK.import SuperTokens from "supertokens-auth-react";
import EmailPassword from "supertokens-auth-react/recipe/emailpassword"
import Session from "supertokens-auth-react/recipe/session";
SuperTokens.init({
appInfo: {
apiDomain: "...",
appName: "...",
websiteDomain: "..."
},
recipeList: [
EmailPassword.init({
signInAndUpFeature: {
signUpForm: {
formFields: [{
id: "email",
label: "Your Email",
placeholder: "Email",
nonOptionalErrorMsg: "Please add your email"
}, {
id: "name",
label: "Full name",
placeholder: "Name",
nonOptionalErrorMsg: "Full name is required",
}]
}
}
}),
Session.init()
]
});
import SuperTokens from "supertokens-auth-react";
import EmailPassword from "supertokens-auth-react/recipe/emailpassword"
import Session from "supertokens-auth-react/recipe/session";

SuperTokens.init({
    appInfo: {
        apiDomain: "...",
        appName: "...",
        websiteDomain: "..."
    },
    recipeList: [
        EmailPassword.init({
            signInAndUpFeature: {
                signUpForm: {
                    formFields: [{
                        id: "email",
                        label: "Your Email",
                        placeholder: "Email",
                        nonOptionalErrorMsg: "Please add your email"
                    }, {
                        id: "name",
                        label: "Full name",
                        placeholder: "Name",
                        nonOptionalErrorMsg: "Full name is required",
                    }]
                }
            }
        }),
        Session.init()
    ]
});
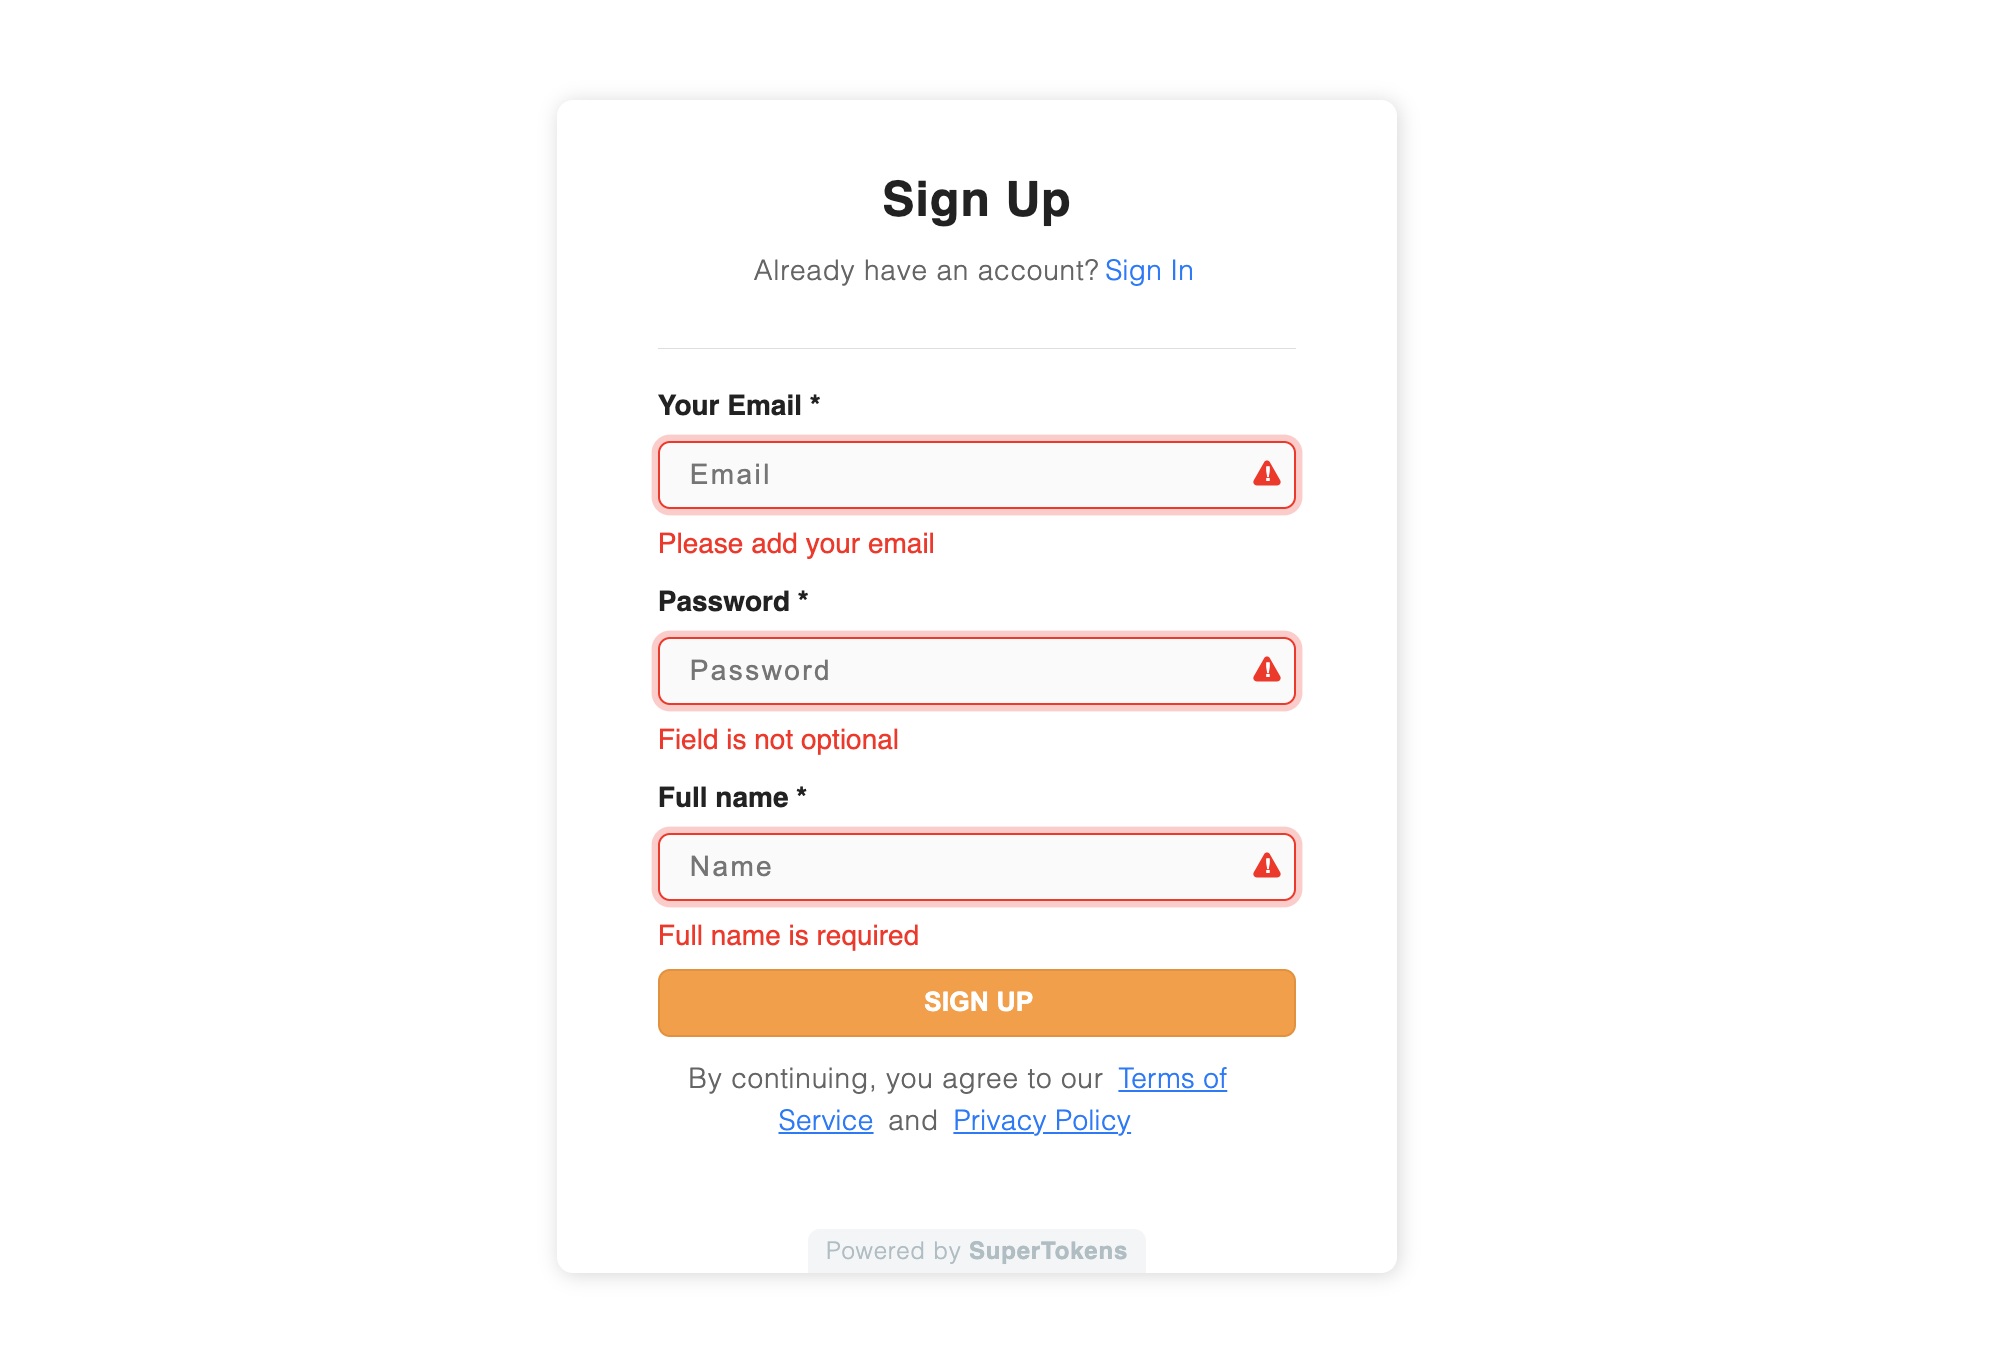
Observe how the password field displays the standard error message because a custom message wasn't assigned using nonOptionalErrorMsg for that field.
tip
To display an error message for required/non-optional fields, make use of the nonOptionalErrorMsg property.
For complex validations of fields, make use of field validators.
Creating Custom Components #
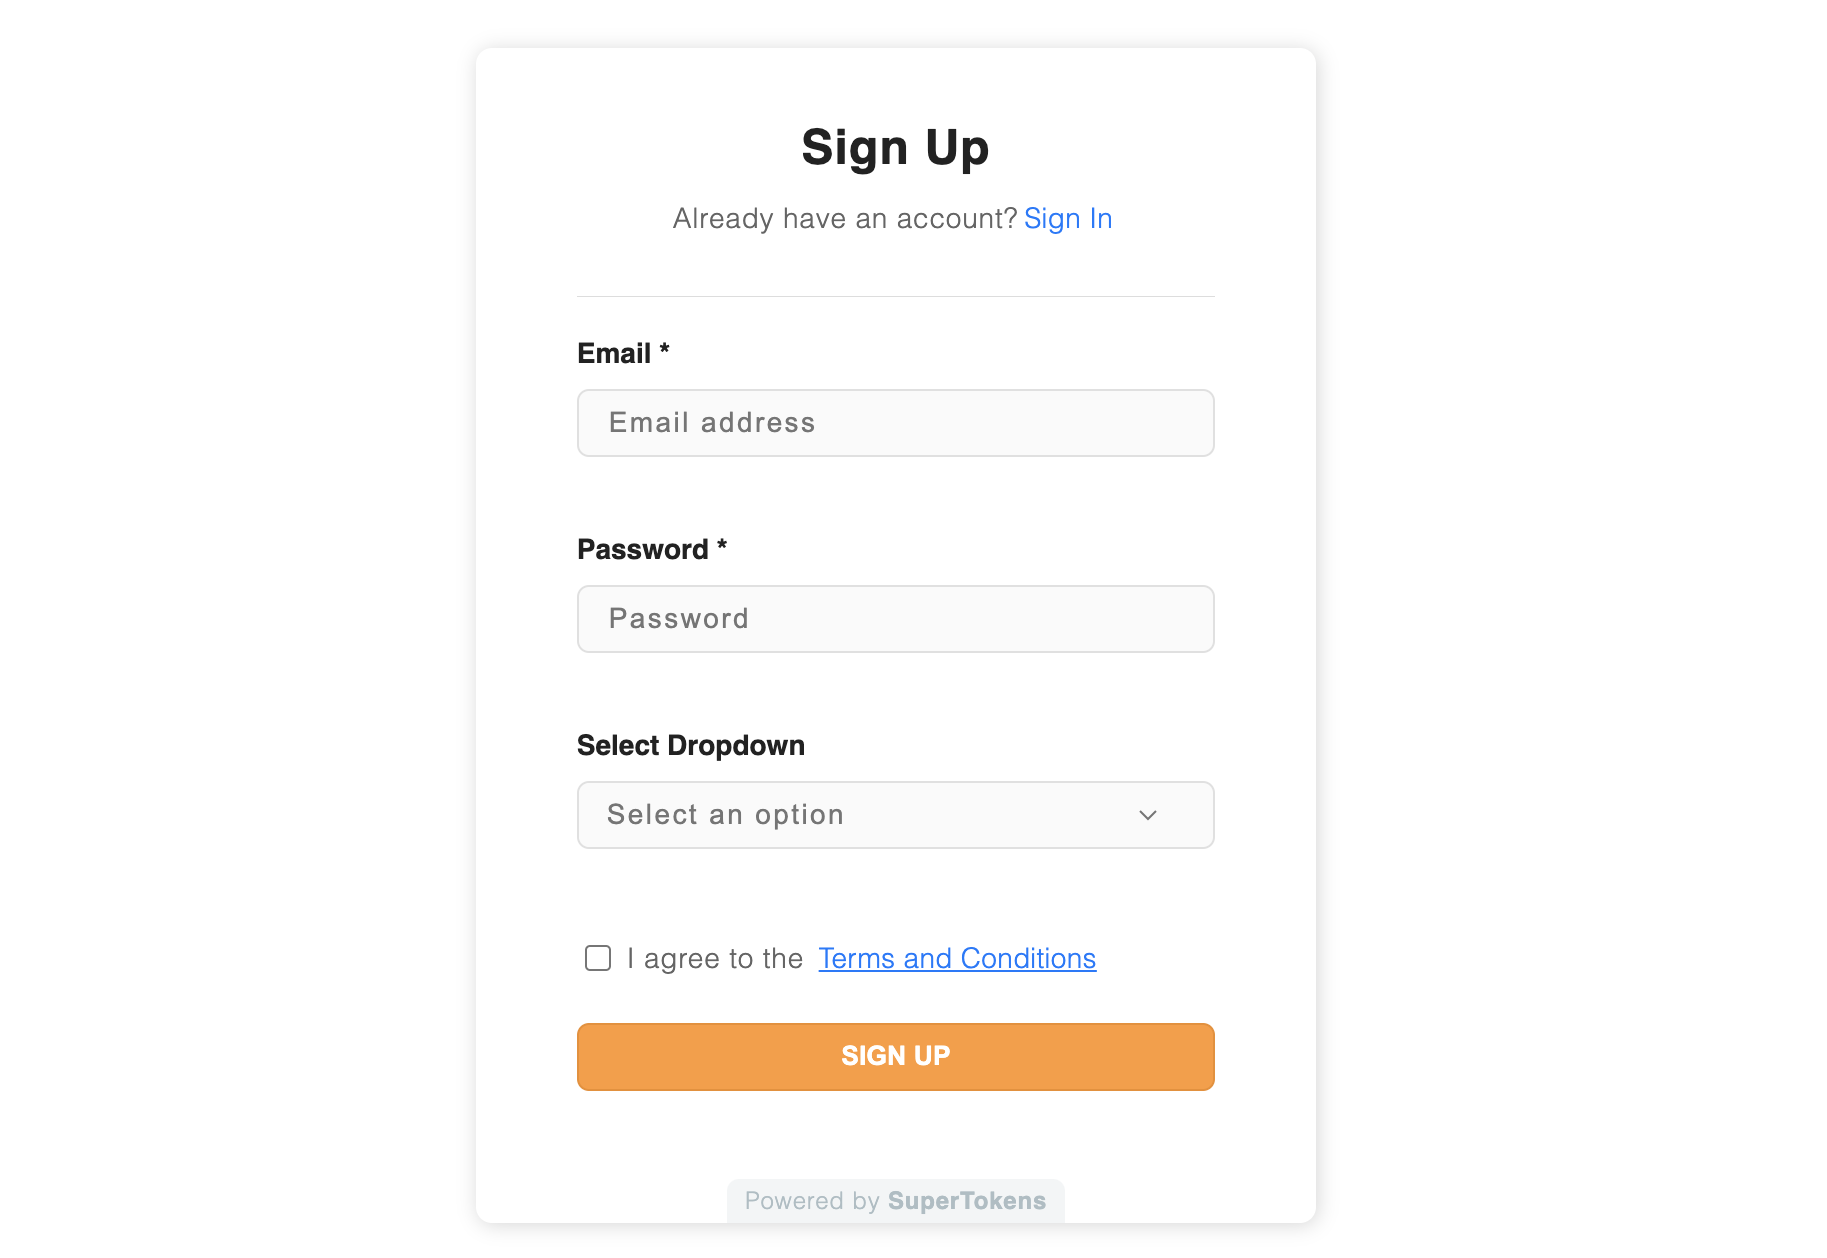
Currently, your sign-up form contains only email and password fields. While you can add additional simple input fields, the form also supports the integration of more sophisticated input types. These enhanced components include radio buttons, checkboxes, dropdowns, sliders, etc., allowing for a more comprehensive user registration experience.
important
You may need to disable the Shadow DOM if you're integrating with a different component library that requires you to import its own CSS. For instance, some component libraries, such as react-international-phone, might expect you to include their CSS alongside their components. For more information, refer to Disable use of shadow DOM.
Let's see how you can extend the Sign-up form to fit your needs.
- ReactJS
- Angular
- Vue
Important
supertokens-auth-react SDK and will inject the React components to show the UI. Therefore, the code snippet below refers to the supertokens-auth-react SDK.import SuperTokens from "supertokens-auth-react";
import EmailPassword from "supertokens-auth-react/recipe/emailpassword"
import Session from "supertokens-auth-react/recipe/session";
SuperTokens.init({
appInfo: {
apiDomain: "...",
appName: "...",
websiteDomain: "..."
},
recipeList: [
EmailPassword.init({
signInAndUpFeature: {
signUpForm: {
formFields: [{
id: "select-dropdown",
label: "Select Dropdown",
inputComponent: ({ value, name, onChange }) => (
<div data-supertokens="inputContainer">
<div data-supertokens="inputWrapper ">
<select
style={{
border: "unset",
borderRadius: "6px",
height: "32px",
backgroundColor: "#fafafa",
color: "#757575",
letterSpacing: "1.2px",
fontSize: "14px",
width: "100%",
marginRight: "25px",
padding: "1px 0 1px 10px"
}}
value={value}
name={name}
onChange={(e) => onChange(e.target.value)}>
<option value="" disabled hidden>
Select an option
</option>
<option value="option 1">Option 1</option>
<option value="option 2">Option 2</option>
<option value="option 3">Option 3</option>
</select>
</div>
</div>
),
optional: true,
},
{
id: "terms",
label: "",
optional: false,
nonOptionalErrorMsg: "You must accept the terms and conditions",
inputComponent: ({ name, onChange }) => (
<div
style={{
display: "flex",
alignItems: "center",
justifyContent: "left",
marginBottom: " -12px",
}}>
<input name={name} type="checkbox" onChange={(e) => onChange(e.target.checked.toString())}></input>
<span style={{ marginLeft: 5 }}>
I agree to the{" "}
<a href="https://supertokens.com/legal/terms-and-conditions" data-supertokens="link">
Terms and Conditions
</a>
</span>
</div>
),
}]
}
}
}),
Session.init()
]
});
import SuperTokens from "supertokens-auth-react";
import EmailPassword from "supertokens-auth-react/recipe/emailpassword"
import Session from "supertokens-auth-react/recipe/session";

SuperTokens.init({
    appInfo: {
        apiDomain: "...",
        appName: "...",
        websiteDomain: "..."
    },
    recipeList: [
        EmailPassword.init({
            signInAndUpFeature: {
                signUpForm: {
                    formFields: [{
                        id: "select-dropdown",
                        label: "Select Dropdown",
                        inputComponent: ({ value, name, onChange }) => (
                        <div data-supertokens="inputContainer">
                            <div data-supertokens="inputWrapper ">
                                <select
                                    style={{
                                        border: "unset",
                                        borderRadius: "6px",
                                        height: "32px",
                                        backgroundColor: "#fafafa",
                                        color: "#757575",
                                        letterSpacing: "1.2px",
                                        fontSize: "14px",
                                        width: "100%",
                                        marginRight: "25px",
                                        padding: "1px 0 1px 10px"
                                    }}
                                    value={value}
                                    name={name}
                                    onChange={(e) => onChange(e.target.value)}>
                                    <option value="" disabled hidden>
                                        Select an option
                                    </option>
                                    <option value="option 1">Option 1</option>
                                    <option value="option 2">Option 2</option>
                                    <option value="option 3">Option 3</option>
                                </select>
                            </div>
                        </div>
                        ),
                        optional: true,
                    },
                    {
                        id: "terms",
                        label: "",
                        optional: false,
                        nonOptionalErrorMsg: "You must accept the terms and conditions",
                        inputComponent: ({ name, onChange }) => (
                            <div
                                style={{
                                    display: "flex",
                                    alignItems: "center",
                                    justifyContent: "left",
                                    marginBottom: " -12px",
                                }}>
                                <input name={name} type="checkbox" onChange={(e) => onChange(e.target.checked.toString())}></input>
                                <span style={{ marginLeft: 5 }}>
                                    I agree to the{" "}
                                    <a href="https://supertokens.com/legal/terms-and-conditions" data-supertokens="link">
                                        Terms and Conditions
                                    </a>
                                </span>
                            </div>
                        ),
                   }]
                }
            }
        }),
        Session.init()
    ]
});
Changing Field Order #
To customize the order of fields in your signup form, you can use the EmailPasswordSignUpForm_Override function. This functionality allows you to rearrange the sign-up form fields according to your preferences.
- ReactJS
- Angular
- Vue
Important
supertokens-auth-react SDK and will inject the React components to show the UI. Therefore, the code snippet below refers to the supertokens-auth-react SDK.Important
supertokens-auth-react SDK and will inject the React components to show the UI. Therefore, the code snippet below refers to the supertokens-auth-react SDK.